

How To Make Pattern For Pants
How to make a pants pattern
The bones pants pattern is one of the pillars in flat pattern drafting. In that location are great benefits for both home sewers and article of clothing designers to know how to draft. But all those numbers and steps to follow are and then frustrating, correct?
Well, they don't have to be. Drafting a pattern from measurements doesn't take to be difficult and intimidating.
Yous might exist thinking:
Why practise I need to learn flat pattern drafting and especially how to draft the bones pant sloper? I am not going to lie – apartment pattern drafting can exist boring and there is simple math involved. It is only a procedure of post-obit some monotonous steps of drafting and connecting dots. But it is necessary for any article of clothing designer.
The reason is – information technology will make your designing efforts easier, not harder. And y'all sew simply for yourself, you can craft the perfect design for your shape and so just modify it to get a dissimilar wait.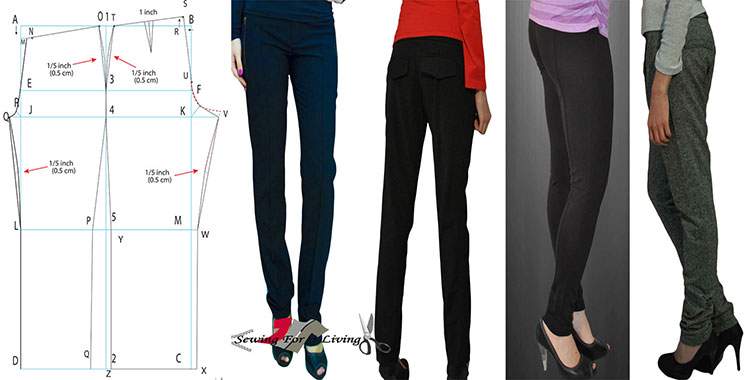
What is the bones pants/trousers apartment pattern making?
This is the process of building up an actual sewing pattern that fits certain body measurements. The basic pants sloper is usually used for woven fabrics and has a classic silhouette. At that place are means to modify information technology into various styles according to your blueprint vision.
However,
this article is nearly drafting a design from custom measurements, not altering a pattern. There is a departure between those two terms. Altering the blueprint is a subject area we are going to deal with in some of the following tutorials.
Ways to arroyo drafting the pattern.
There are different approaches to drafting the pattern – some chose to build the front panel showtime. And so, on superlative of it to build up the back panel. I prefer to utilize a method according to which both the front and back panels of the pants blueprint are drafted simultaneously. This way the blueprint is much easier to change once information technology is drafted.
You might detect another technique more appealing, so experience free to use the i that works best for you. There is no correct and wrong here. Besides, this is a tutorial on the basics of drafting the pattern. If you lot would like to get deeper into the subject and follow up with muslin adjustments and refining the fit, there are boosted steps involved.
Taking the trunk measurements for a pants design
Taking body measurements is the first step in the process. It is very important to have accurate measurements. If
they are not authentic, it might influence the last result significantly.
Measurements and calculations for drafting a flat pants pattern: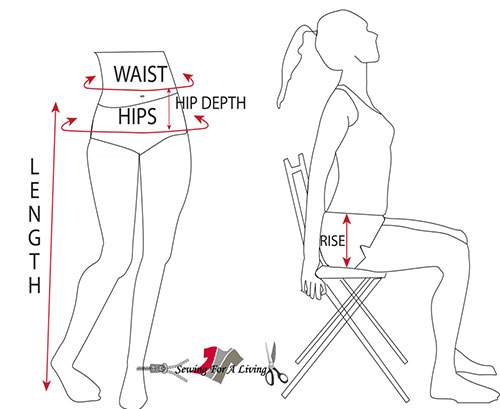
- ¼ Waist
Measure the waist at the smallest. Or, if you prefer the pants standing lower on the hips, measure that circumference. Divide information technology by iv, considering we are going to work with 1/4 of the pants details.
- ¼ Hips
Measure at the widest office of the hips. Again, divide this number past four.
- Crotch depth/rise
Yous tin get this measurement by sitting on a chair and holding a ruler next to your hips. Measure from the chair upwards to where you want those pants to stand.
- Hip depth
This is the altitude between the waist and the hips you but measured.
- The magic formula. To describe the crotch curve, we will need to know how far we should extend information technology on both the front end and the back pattern detail. At that place is a simple formula to help us with that.
Forepart crotch extension formula: Back crotch extension formula:
15% of ¼ hip 45% of ¼ hip
Or, one time you've calculated the front crotch using the formula in a higher place, simply multiply information technology by 3 to get the dorsum crotch.
- Length
Measure out the overall length of the pants on the outer leg. Showtime from the waist (or a flake lower if yous prefer lower-rising) and measure down as long equally you desire the pants to be.
2.Building the pants/trousers sloper.
ii.1 Outline the pants blueprint.![how to draft pants pattern]()
The first stride to take when drafting the blueprint is to outline information technology. We are going to do that by drafting a rectangle every bit follows:
- From point A to B, utilise half of the hips measurement (or 2 times i/four hips). From B to C and from A to D, apply the overall length.
- Divide the rectangle in one-half so that you get ii 1/4 hip-wide panels. Mark the points that cantankerous the horizontal lines every bit 1 and 2.
We piece of work with a quarter hip because we are going to typhoon a front and a back console. We use each of them twice to cut two fronts and ii back pieces of the pants (FIGURE 1). That gives us a full of four details to work with.
- The next step would be to apply the hip depth. Starting from A and B, apply the hip depth and mark points E and F. Connect them with a dotted line. Mark signal three where the new line crosses the vertical line in the middle.
- Once again, starting from A and B down, use the rise and mark points Yard and H. Connect them with a dotted line. Marker point four where the new line crosses the vertical line in the middle.
- Outset from the bottom line and use the knee level, marking points I and J. Mark point 5 where the new line crosses the vertical line in the center.
Now that we have the blueprint outlined, permit's kickoff

2.two. Drafting the front panel of the pants pattern.
- Start with measuring one inch (two.five cm) down from signal A to point D and mark point M.
- From point K, measure an inch (2.5 cm) towards the middle and mark it as point 50.
- From point L, utilize 1/4 waist measurement and depict a line that connects with the horizontal line of the rectangle. Mark point One thousand.
- Connect M with iii, and 3 with iv.
- From signal Thousand, extend the line equally long as we calculated the front crotch (using the formula to a higher place) and mark it as signal North.
- From point Chiliad, draw a ⅗ inch (1.5 cm) long line at a 45-caste angle and mark point O.
- Connect points Northward and 50, passing through the new points O and E to create the crotch curve.
- Measure i.2 inches (iii cm) from points 5 and 2 in (on both knee and hemline) and mark points P and Q.
- Connect North–I–D and 4–P–Q to form the leg shape.
- Connect D and Q to finish the forepart panel at the hemline.
The last thing we need to do hither is to brand the lines more natural and polish as we are used to seeing them on patterns.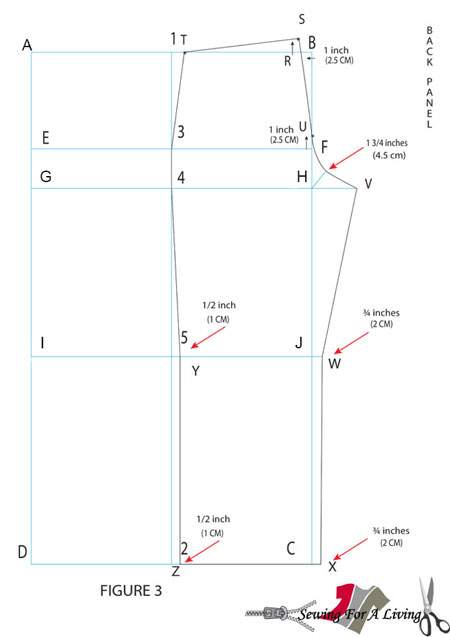
We are going to practice this in the final step. For now, let'due south brainstorm
2.3. Drafting the back panel of the pants pattern
- First by measuring 1 inch (2.5 cm) from B towards A and marker point R. From point R, measure another inch (2.5 cm) straight upwardly and mark bespeak S.
- From point Due south, apply 1/iv waist measurement plus ane inch (for the dart) and draw a line that connects with the horizontal line of the rectangle. Mark point T. We are going to draft the dart later. Connect T with three, and three with 4.
- From signal H, extend the line as long as we calculated the back crotch and mark every bit bespeak V.
- Starting at point H, draw a 1 ¾ inch long line (4.5 cm) at a 45-caste bending.
- From point F towards B, measure out an inch (2.5 cm) and mark signal U.
- Connect points S and 5, passing through the end of the 45-degree bending line and the new betoken U to create the dorsum crotch bend.
- Extend from bespeak J out ¾ inches (ii cm) and marking bespeak Westward.
- Exercise the same from betoken C out and marker bespeak Ten.
- Starting at points 5 and 2, measure 1/2 inch (i cm) in and mark points Y and Z.
- Connect V–West–X and 4–Y–Z to class the leg.
- Connect Z and X to terminate the back panel at the hemline.
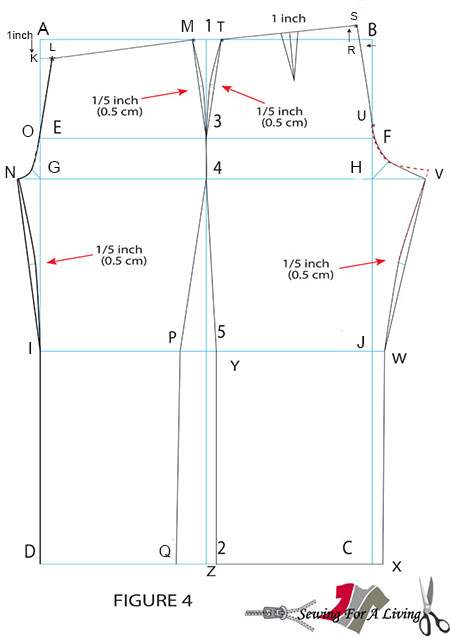
1.3. Concluding adjustments to the pants pattern
![trouser pattern]()
- When we drafted the back panel of the pants sloper, we left an inch (2.v cm) for a sprint. To make it, measure out and mark the middle betwixt points T and S. Utilize one-half an inch in both directions. Draw a 2 inch (5 cm) long perpendicular line. Connect the stop of that line with both sides of the dart. This volition consequence in a sprint that is 1-inch deep.
- Now, permit's make the curves of the pattern a fleck more natural. Draw a perpendicular line 1/5 inch (0.v cm) right in the middle of lines M–3 and T–3. Redraw those lines, making a small curve that passes through the terminate of that i/v inch (0.five cm)- long line.
- Do the same with the inner leg lines N-I and Five-W. Instead of drawing the curves out, draw them inwards to brand the curves.
- Make sure that the inner leg of the front blueprint piece matches the back'due south inner leg. If in that location is a slight departure, just move point V accordingly up or down a niggling and redraw the dorsum crotch curve.
- Draw the grainline equally a line perpendicular to the genu line.
These were the concluding steps in drafting a pants/trouser blueprint. Delight, take in mind that this is a very basic sloper that can be modified in diverse ways.
To apply it equally a pattern, you also need to add seam and hem assart. According to your fabric choice, you likewise need to add together wearing ease to the sloper.
You can modify the length and width of the legs, add a zipper fly and pockets, change the depth of the darts, etc. As well, you can tailor it in one case you've drafted it.
For case, yous can remove wrinkles on the crotch or bottom, lengthen or shorten it in the hips area, etc. Here is a mail on how to further fit the basic pants pattern.
Y'all can also use it as a base for modifications, like knitted cloth pants, leggings, or harem pants pattern.
Like what you read here? Support my site
If you would like to help me continue delivering similar content, please consider buying me a coffee to keep it going. I would really appreciate it.
Related posts:
- Article of clothing pattern – design harem pants from a pants blueprint
- Clothing Design – How to Design Pants
- three Easy Ways To Draft a Harem Pants Blueprint
- How to draft a circumvolve skirt pattern
- Complimentary Downloadable Sewing Pattern and Sewing Instructions – Harem Pants
Source: https://sewingforaliving.com/how-to-draft-a-pants-pattern/
0 Response to "How To Make Pattern For Pants"
Post a Comment